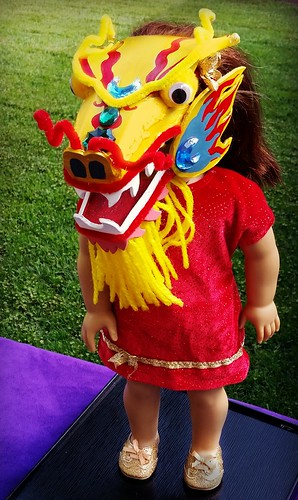
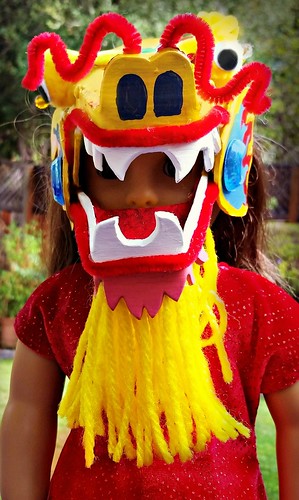
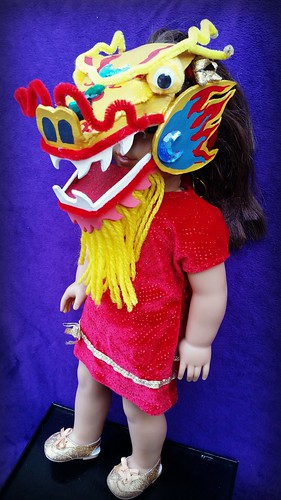
This year, 3Po decided he wants to be a Chinese Dragon for Halloween. I put my creative hat on and helped him search for tutorials for make-your-own Chinese Dragon costumes. I found a great YouTube tutorial for a parade dragon and came up with a pattern based on their dragon head. I decided to make a small-scale prototype to see whether it would be feasible for us to make it without all the industrial equipment on the video. By this time, I had spent so much time on the project, I decided to turn the prototype into an American Girl doll craft! After all, dolls need Halloween costumes too, right?
Here's the pattern I came up with. I plan to magnify this pattern to child size (I'm guessing 300% or 400%) for 3Po's dragon mask, but as it is, this pattern is sized perfectly for an American Girl doll to wear on her face as a mask. You may need to tweak the pattern a bit
Print the pattern out (at 100%) and cut out the pieces. Note, at this point, you may want to put the dragon's head together with tape, and try it out on your doll. Depending on how you want it to fit, you may have to make a few adjustments to the pattern. Do this before you start hot gluing!
Trace the pattern out onto thin foam, and cut out the pieces. Note, since this was just a prototype, I used a cheap yoga mat that happened to be blue in color. In retrospect, I would have used a color of foam that's as close as possible to the color you want your dragon's head to be (in my case, yellow). You'll save having to paint an extra coat or two. Also, cut inside the lines, not outside the lines. I found out that it's really difficult to cover permanent black marker ink in yellow paint!
Hot glue the tongue (part #5) to the lower jaw (#4).
Hot glue the upper jaw (part #3) to the head (#1). Don't forget to fold out the nose (along the dashed lines). The gluing turned out to be trickier than I had anticipated, so I enlisted the help of a few strips of duct tape (again, try to use the same color duct tape as the color you want your dragon's head to be -- in other words, don't use pink tape and blue foam like I did!).
Hot glue an eye socket (part #2) to each side of the head (#1). Again, use duct tape to help you!
Hot glue the lower jaw (part #4) to the upper jaw. Hot glue the cheeks (note: I did not include a pattern for the cheeks! You'll have to draw that part freehand!) to either side of the head. Your basic dragon head is now complete!
Now comes the fun part: painting and decorating your dragon head. Every dragon is different, and you're free to use whatever colors and embellishments as you want! I'll just mention a few suggestions and tips below:
Colors
You may need several coats of paint to even out the color (let dry for a couple of hours between each coat). For the head, I used about 3 coats of yellow paint, then a topcoat of gold paint. I painted black nostrils, a few red swirls on the nose, plus red and blue flames on the cheeks. The teeth are white. The tongue is red. The beard is orange.
Lips
Hot glue red pipe cleaner around above the top teeth, and below the bottom teeth.
Flames
Hot glue red pipe cleaner above the nostrils and bend to a wiggly shape.
Eyebrows (in my dragon's case, it's more like a unibrow!)
Hot glue yellow pipe cleaner along the top ridge of the head, above the eye socket. Hot glue a small bead to each end of the pipe cleaner.
Eyes
Hot glue a wiggly eye to a yellow pompom ball, then hot glue the pompom ball into the eye socket.
Beard
Hot glue strips of yellow yarn onto the dragon's chin.
Mask string
Hot glue gold elastic string onto either side of the dragon's inner cheek. Make sure each piece of string is long enough for you to tie the mask around your doll's head.
Doesn't it look gorgeous? I can hardly wait to make this mask, with 3Po, in human child size! Stay tuned for a post with 3Po in his dragon mask, but for now, enjoy these adorable photos of The Pea's doll (I think this is McKenna) in her red and gold sparkly dress and Chinese Dragon mask.


.jpg)
.jpg)
.jpg)


No comments:
Post a Comment