
 I love baking cookies, but until recently I've never been fond of baking cutout cookies. I've always found them to be too much effort, the results too uneven, the taste too bland. For lazy bakers like me, bar cookies like lemon squares or heath toffee bars are the only way to go: just dump your whole bowl of batter into a pan and cut into squares! Even drop cookies are easier because you don't have to keep rolling out the dough. Sure, drop cookies and bar cookies are inherently less uniform than cutout cookies (less cookie-cutter perfect, if you will!), but I figure you can always
 I think I may have to eat my words (or cookies): this past month I've made cutout cookies no less than four times! I've discovered three things that make baking cutout cookies not only less tedious but actually enjoyable.
The first thing you need is a good recipe, and I think I've found mine. It's an old cookie recipe that's been lying around in my old Joy of Cooking cookbook since forever. It isn't even a part of that cookbook; I tore it from an old issue of Parenting Magazine and kept it folded between the cookbook pages along with a couple of recipes for pumpkin soup and candied walnuts. Since it freezes well, I was able to make a bigass batch of basic dough, then jazz it up to make four completely different kinds of cookies!
The second thing you need is parchment paper. Bonggamom, where have you been? I can't believe I ever baked cookies without parchment paper! The cookies don't stick to the cookie sheets, and I don't have to clean cookie sheets in between batches. Actually that applies to all cookies; my aha! discovery is that I can roll cookie dough in between two sheets of parchment paper, which makes rolling smoother and cleanup faster.
 My final discovery for easy cutout cookie making is a set of rolling pin rings. These are pairs of rubber bands that you slip onto your rolling pin, one on each side. Each pair of rings are a different thickness (1/16", 1/8", 1/4", 3/8"), so they keep your rolling pin evenly spaced above your rolling surface. Now I always get the dough thickness right, and my cookies never end up too mushy or too brittle, or unevenly baked because one side of the cookie is twice as thick asn the other half. The come out just the way the recipe intends them to be: beautiful and yummy.
Now here's the part where I get to brag a little. Check out my latest cookies:
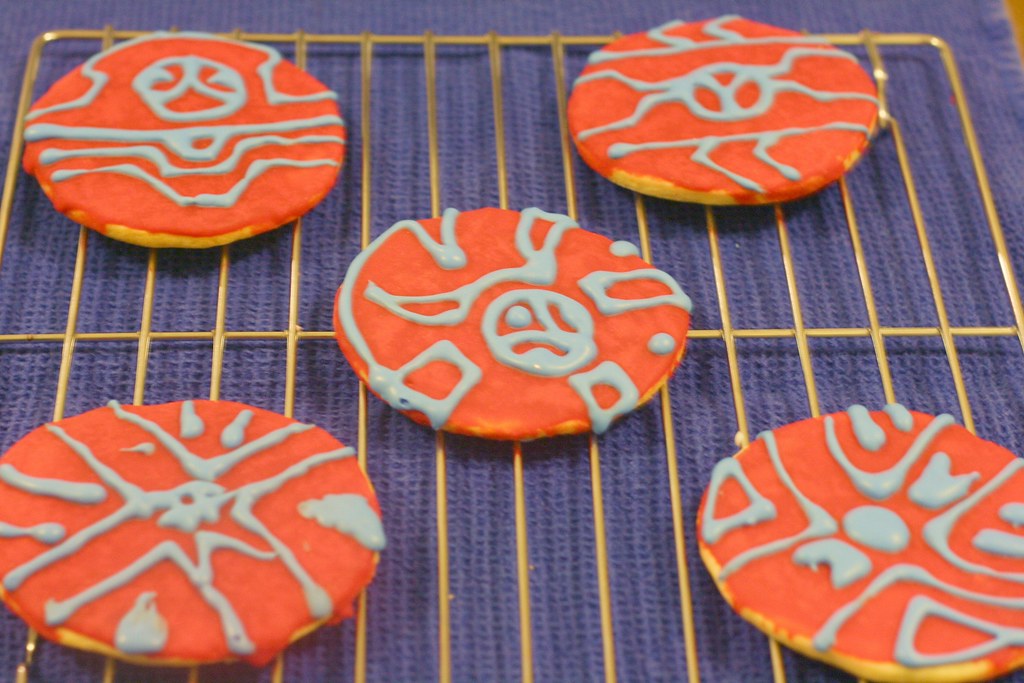 The basic cookie recipe lends itself perfectly to royal icing, because the cookies are not too sweet, and they don't puff up when they bake, so the icing doesn't drip down the sides. To glaze the whole cookie, I make a runny icing, pour it into a bowl, and dip the whole cookie in it. To pipe designs, I make a stiffer icing and put it in a plastic ziploc bag. Then I snip out a tiny bit out of one of the corners, and voila! An instant pastry bag, and cool Bakugan cookies for my boys' birthday party.
 For Alfie's poker night a couple of weeks ago I used the same basic recipe and dipped half of each cookie into melted chocolate. I simply shaved a block of Scharffen Berger 70% cacao chocolate (you can use chocolate with a lower percentage, but Alfie is a dark chocolate man), melted it in the microwave and dunked away. Throughout the night Alfie and his buddies fought over these cookies like they were poker chips.
 For last week's Valentine's party I added some cocoa powder and oil (you can also melt some chocolate and add it to the batter) and turned the basic cookie into a chocolate cookie. I cut out little hearts and iced them up to make them look pretty. They're the perfect sweet treats and all the guests were dying to get a piece of my heart(s).
 Finally, what could be more fun than cookie dough sculptures? This dough is super kid-friendly; it stands up to a lot of handling without getting tough or gummy (if it gets too soft, just stick it in the fridge for another 20 minutes). I always reserve the last bits for the kids to mold into whatever shapes they want. It saves me the trouble of fiddling with the scraps, and the kids are only too happy to play with some edible Play-Doh. Last week The Pea used her lump of cookie dough to make a chocolate snowman, and Jammy sculpted a..... well, I don't like to say what I think it looks like because you might lose your appetite, but I told him it was too bad that his arch collapsed while it was baking in the oven and it still looked very original. Okay, the looks aren't much to brag about, but it doesn't matter what it looks like once you put it in your mouth, and at least Jammy got to exercise his creative juices.
Here's the recipe for the basic cookie dough so you can get the fun rolling in your own kitchen:
Basic Cookie Dough
by Rosemary Black, published in Parenting Magazine, Dec/Jan 2003
This dough is very child-friendly -- it comes together quickly and stands up to a lot of handling. Turn it into cut, rolled, and decorated cookies, for giving or for enjoying at home. You can double or triple this recipe and freeze a batch or two for later.
Prep time: 15 minutes
Chilling time: 1 hr or overnight
Baking time: about 10 minutes
Yield: 36 Cookies
Ingredients:
* 2 sticks (1 cup) unsalted butter, at room temperature
* 1 cup sugar
* 2 eggs
* 2 tsp vanilla extract
* 3 cups all-purpose flour
* 1/2 tsp baking soda
* 3/4 tsp salt
* Nonstick cooking spray
1. In a large bowl, beat butter with electric mixer for 1 minute. Gradually add sugar and beat until smooth. Beat in eggs, one at a time, then vanilla extract.
2. Measure flour into large sifter set over dinner plate. Add baking soda and salt. Sift flour mixture into egg-butter mixture; beat on medium speed until smooth. If dough is sticky, beat in a few more tablespoons of flour.
3. Remove dough from bowl, form into 3 balls, and wrap each in plastic wrap. Refrigerate for at least an hour or overnight. (Dough may also be frozen.)
4. When ready to bake, preheat the oven to 375 degrees. Set the dough on work surface for 5 to 10 minutes or until pliable, or knead it 4 or 5 times to soften. Coat a baking sheet with nonstick cooking spray.
5. Roll out dough to about 1 1/28 inch thick. Cut out cookies with a table knife or 3-inch cookie cutter. Reroll the scraps and cut out more cookies.
6. Place cookies on the prepared baking sheet 1 inch apart; bake for 10 minutes or until bottoms start to brown and tops are firm. Remove with a spatula to a wire rack. Let cool about 15 minutes.


2 comments:
These look so good! And how I'm hungry.
I have GOT to find those rolling pin bands. And a new gasket for my pressure cooker. More items to put on my shopping list!
Post a Comment