▼
How to make a Doll's Halloween Treat Bag from Duct Tape
A couple of weeks ago I wrote a post on how to make a Halloween treat bag from duct tape. It was so easy and so much fun that I decided to make a matching bag for The Pea's American Girl dolls. This miniature version looks just like its full-sized counterpart, and it's even easier to make. Here's how:
You'll need duct tape (2 inches wide) in 3 different colors. I used solid black, solid orange, and a monster-pattern. You'll also need an exacto knife or cutter, a metal ruler, and a cutting board (I used an old chopping board!).
Here's the list of pieces of duct tape you'll need to cut:
For the main (front/back/bottom) panel
2 strips of patterned duct tape, 2" wide x 10" long
2 strips of black duct tape, 2"wide x 10" long
For the side panels
2 strips of patterned duct tape, 2" wide x 4" long
2 strips of black duct tape, 2" wide x 4" long
For the side piping
2 strips of orange duct tape, 1" wide x 12" long
For the top piping
1 strip of orange duct tape, 1" wide x 12" long
For the handles
2 strips of orange duct tape, 1" wide x 6" long
Measure and cut your strips a bit longer than indicated (i.e. for the sides, cut your duct tape strips to about 4.25" instead of 4" long), so you can trim them neatly.
Most of the duct tape in stores is 2" wide, so you may have to split a strip in half to get a 1-inch wide strip. You can do this by laying the 2-inch duct tape over a metal ruler so that the ruler covers an inch of width, then running your cutter edge along the length of the ruler.
Lay the 2 patterned 10" strips side by side, overlapping slightly so that you have a single panel that is about 3.5" wide and 10" long. Flip over so that the sticky side is up, then lay the black 10" strips on top. Now you should have a panel that is 3.5" wide, 10" long, patterned on one side and black on the other side.
To make the side panels, take 1 black 2"x4" strip and 1 patterned 2"x4" strip and stick them together, back to back. Repeat for the second side panel.
Lay out the panels as shown in the photo, patterned side down. Tape the side panels to the main panel with the 2 strips of orange side piping.
Fold over the edges of the piping.
Fold the main panel over in half so that the black sides are on the inside of the bag and the patterned side is on the outside of the bag. Line up the edges and tape them down with the piping.
This is what your bag should look like at this point.
Add piping to the top edge of the bag, folding the tape over so half of the tape is on the inside of the bag, and half is on the outside.
For the handles, cut a small slit (1 or 2 inches) at each end of the orange handle strips.
Fold the strip of tape in half lengthwise, make sure the 1 or 2-inch portion at each end does NOT stick to each other.
Attach the handle to the inside and outside of the bag. You're done!
Here are McKenna (in the ballerina costume) and Mia (in the cheerleader costume), all set to load their treat bags with goodies.
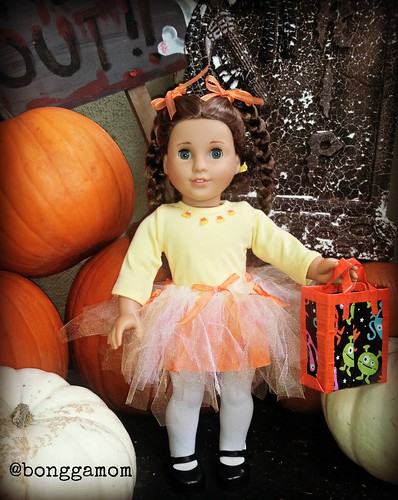
And here's Marie-Grace, posing with her treat bag in her very own pumpkin patch.
Click here for instructions on how to make Marie-Grace's candy corn tutu.


No comments:
Post a Comment